![]()
![]()
![]()
![]()
![]()
![]()

![]()
![]()
![]()
![]()
![]()
![]()
|
|
|
|
Important note! Any balancer parts purchased from studebaker, mashonline, or klr650.com after late May of 2008 are not genuine Eagle parts. Genuine Eagle levers/doohickies are H900 condition, and much stronger than the H1150 condition currently advertised by KLR650.com. The torsion spring that hooks into the adjustment slot is a 100 percent Eagle design. Please insist on genuine Eagle parts. I'm glad to support Eagle parts. If your parts are not genuine Eagle please get your support from the people that made them. All the best!
You can now order genuine Eagle parts here: eaglemike.com
We will show how to install a torsion spring to your KLR650 balancer system, replacing the factory extension spring - this setup is far superior to the extension spring setup. Read all the instructions before starting. Please call me if you have any questions. The torsion spring has a longer adjustment life then an extension spring. It is also captured by the balancer lever. It also takes the slack out of the system in the best possible way! This could be done as part of the balancer lever upgrade process. The factory springs are known to break fairly often. They run out of tension, usually by 5000 miles or less. The body of the torsion wraps around the balancer lever, making it pretty much impossible for it to get loose and go through the engine. The factory spring has been known to cause damage from time to time. Sometimes it causes the cam chain to jump time. You can click on the photo's below to enlarge them. Just click on your back arrow when you are finished viewing them. The pictures shown here were taken using an early 1996 engine. This engine has the early idler shaft - the shaft the balancer lever fits onto. Engines from 1987 into 1996 used this shorter shaft. Later in 1996 Kawasaki went to a longer shaft and bearing. You'll start by opening up the left side of the bike. Use the balancer upgrade instructions to help you do this. You'll need to go all the way to the part where you're ready to install a new extension spring to replace the factory part. IMPORTANT: Be absolutely sure you don't drop any parts into the engine during the process. A flexible magnet (the kind with a magnet on the end of a flexible aluminum wire is best) can be a big help. If you find the factory spring or lever is broken, fish around in the engine case until you get the parts. Broken parts are often found on the oil intake screen, found behind the clutch cover. Parts in this oil intake area cannot be fished out from the left side of the engine- you have to take apart the right side of the engine. When removing the left side inner case to get to the factory spring, keep pressure on the idler shaft - the part the balancer lever aka doohickey - fits onto. Don't let this shaft slide out with the inner case as you remove it. If you do, you can drop the thrust washer behind the idler sprocket. If you drop it, find it and put it back, no problem. If you drop it and don't fix it, the potential for catastrophic engine damage is there! You can also always reverse the install, going back to a factory style extension spring any time you like. So - you've read all this, followed the instructions, and you're ready to remove the factory spring. The engine gasket might deceive you here, as there is an extra tab that hides the peg the spring slides onto. If you can't see the end of the peg gently pull the gasket away from the crankcase, or trim it back to the edge of the boss for the adjacent screw. You'll need to leave the factory spring lever in place. It will act as a spacer, keeping the end play correct in the assembly. Here's a pic where you can see the eccentric shaft, with the old spring lever in place. You won't use the extension spring AND the torsion spring. So - if you are installing the torsion spring, skip the part in the rest of the instructions about installing a new extension spring. Just take the old one out. (fish for the pieces if it was broken)
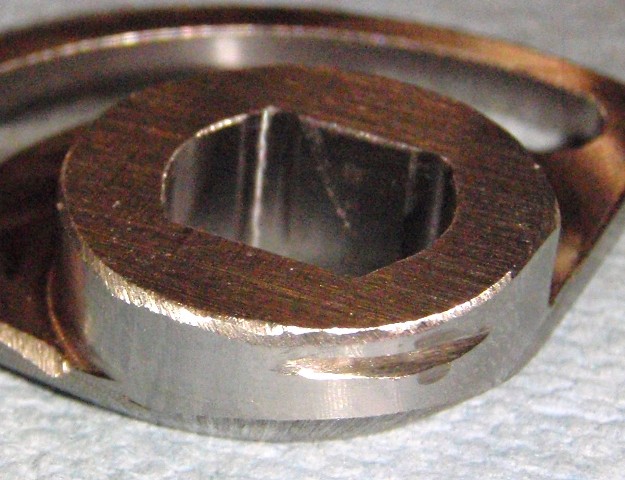
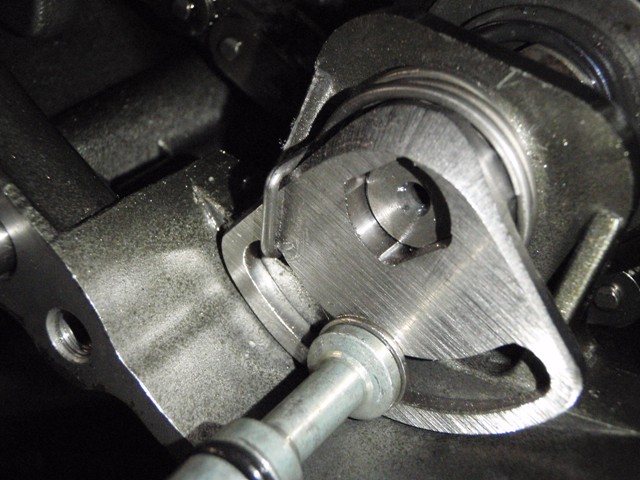
Important note! Update! Sometimes the big starter gear runs out quite a bit. A few people found it ran out enough to touch the torsion spring. The below tips and technique remove this! If your balancer lever doesn't have the groove shown below, use a file or Dremel tool to make one. It doesn't need to be real deep, .020" or so is enough. Just enough for the outer coil of the spring to snap into, and stay in place.
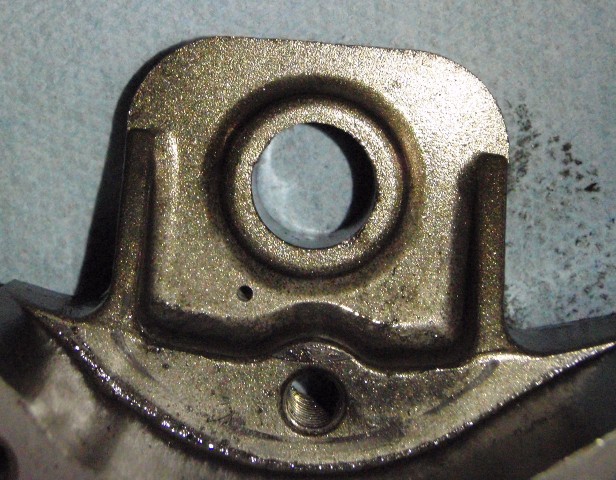
A little more than halfway from the bevel to the face of the boss works. The part is so strong there is no way it will be affected by this. In fact, a lot of the material you see around the boss (the round part the shaft fits into) doesn't even exist in the "new, improved" Kawasaki factory part. (to say nothing of the loose fit and non-functional spring). You'll need to drill a 1/16" hole in the inner case as shown below. The hole goes all the way through the aluminum. It's better if the case is off the engine (of course) to keep the aluminum chips from getting into the engine. If you want to change the spring tension in the future, you can drill another hole leaving at least 1/8" inch of material between the edges of the hole - 3/16" at least would be better. You could also fill the old hole with an epoxy after thoroughly degreasing it with brake parts cleaner, or something similar. Keep it as straight (square to the surface) as you can. A number 52 or 51 drill could also be used (a little larger) if that makes it easier for you. There is a little tolerance on the hole location. The hole shown in the pic could be moved about 1/32 of an inch or so towards the idler shaft - the shaft the balancer levers fits onto. NOTE: the hole location shown in this pic is approximately 7:30. The current springs require a hole drill between 5:00 and 5:30, or a little to the right of the 6:00 position. This is the correct location for the current design of spring. If the ends of the spring are approximately 180 degrees from each other, this is the location to use. If there has been a bunch of wear on the balancer system, the location might need to be changed for best application. The drill diameter is 1/16". There will also be a note about this in or on the package containing the lever and/or the torsion spring. This is the best location for most bikes. It might help if you lay the spring against the case so you can see the arc. Remember the arc will get a little smaller as the spring tightens. Yes, I know the inner case design is slightly different for the 2012 and later. Don't worry about it. Drill the hole in the same position. Center the spring around the shaft hole in the case to help locate the radial distance from the hole.
Put the inner case back on. Sometimes it helps to spread the case a little at the 5 o'clock position to get it over the dowel pin. Install and torque all the bolts to 69 inch-lbs. Put the spring in place. The straight short leg goes into the hole you just drilled.
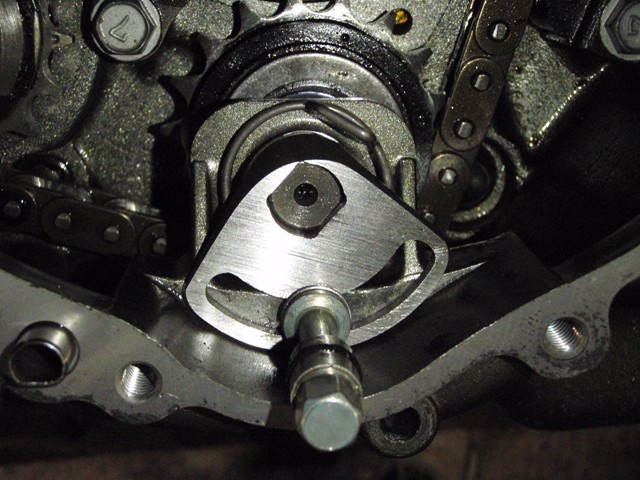
Put the lever in place. Put the lever adjustment bolt in place, but don't tighten yet. On the 2008 and 2009 bikes, put the little washer in the kkit under the head of the bolt. Push the right had side of the lever towards the front of the engine, and then tighten the adjustment bolt enough to hold the lever in this position. This will hold the lever in place while you install the other end of the spring.
Now install the other end of the spring. Don't use pliers or vise grips. I use a screwdriver to push the spring around. A tip! Get the end that will hook into the slot on top of the lever as you push the end around. This will make it much easier to push into the groove. You'll need to navigate around the crankshaft. This will probably take a couple of tries, as you will be fighting the spring tension as you put the hook in place. Here's a pic with the spring attached, but not yet seated down and into the groove.
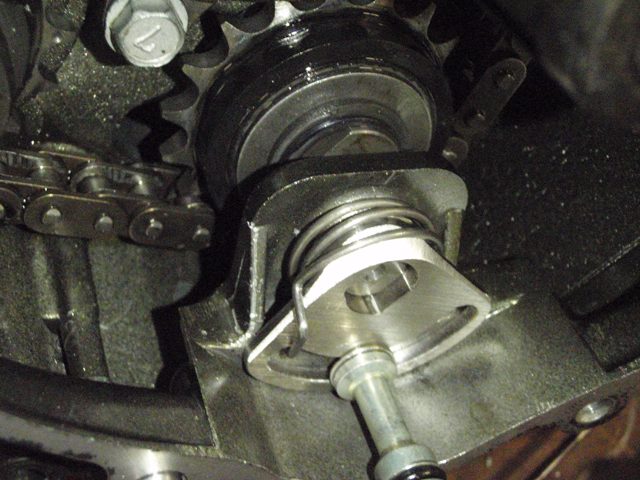
Be sure to push the coils towards the center of the engine so they will lay as flat as possible. The groove will keep the spring in place. Very simple, and works very well. This makes sure the big starter gear will not hit the spring. This big gear only rotates when you are starting the bike - unless something is quite wrong - it's connected to the starter. At times the big starter gears runs out (doesn't run true) quite a bit. Some have ground off the high spot(s) on the starter gear in the past. This doesn't cause any problems if your starter gear runs out enough to hit. Here's a pic with everything pushed flat, into place.
Leave the bolt about 1/2 turn loose to make it easier to install the outer case. Tighten this bolt when you tighten the outer case bolts. Return to the balancer lever instructions for the rest of this process. Please call me if you have any questions! |
|
Send mail to
Webmaster with questions or
comments about this web site.
|
![[Under Construction]](images/undercon.gif)